Introduction
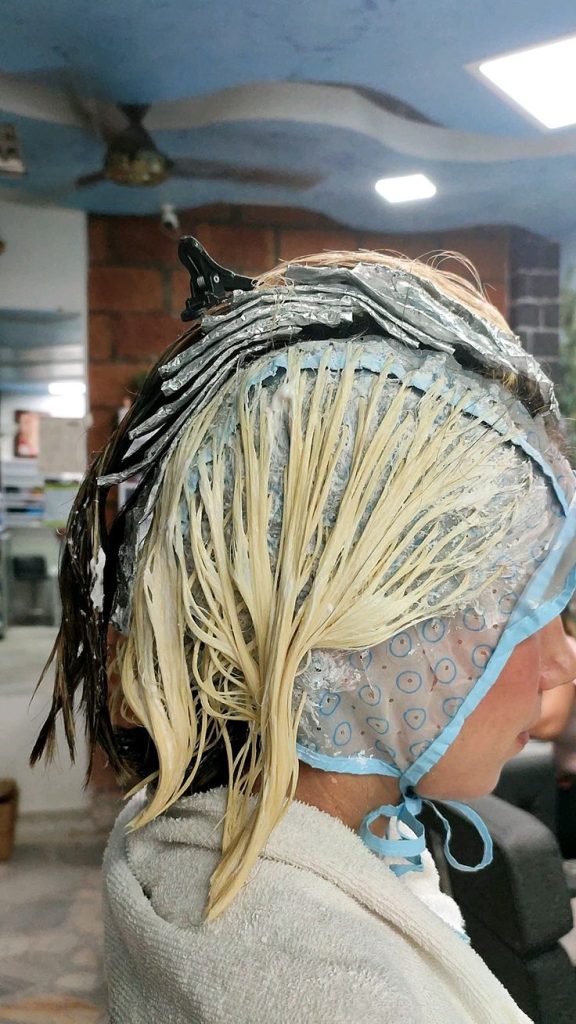
CAP LAGANE highlighting is an artistic hair-coloring approach that utilizes a specialized cap adorned with pre-pierced apertures. Hair sections are meticulously drawn through these apertures and subsequently treated with color or bleach. This ensures a methodical placement of highlights, catering to those seeking a structured and harmonious aesthetic.
Key Contrasts with Alternative Highlighting Techniques
Unlike foil highlighting, which caters to broader section customization, or balayage, celebrated for its freehand and naturalistic allure, cap highlighting offers a regimented, symmetrical pattern. It is particularly suited for short to medium-length hair, where precision reigns supreme.
Enduring Popularity and Modern-Day Relevance
Having risen to prominence during the 1970s, cap highlighting remains a favored technique for its cost-effectiveness and user-friendly nature. Though contemporary methods like balayage dominate headlines, cap highlighting holds its ground among professionals and do-it-yourself aficionados for crafting fine, consistent highlights.
II. Tools and Materials Essentials
To undertake cap highlighting, the following instruments are indispensable:
- Highlighting Cap: Crafted from latex or silicone, these caps feature methodically spaced openings.
- Pull-Through Hook or Needle: Essential for threading hair strands through cap apertures.
- Bleaching or Coloring Formula: Select a product tailored to your hair type and desired effect.
- Protective Gear: Gloves and coverings to safeguard skin and hands.
- Mixing Bowl and Applicator Brush: For uniform preparation and application of the coloring medium.
III. Step-by-Step Execution
1. Preparation
Commence by thoroughly cleansing and drying your hair. Clean hair ensures the color adheres uniformly. Opt for a snug-fitting cap to minimize shifting during the procedure.
2. Cap Application
Secure the cap firmly, ensuring it sits evenly across your scalp. Fasten any straps or ties to stabilize its position.
3. Strand Selection
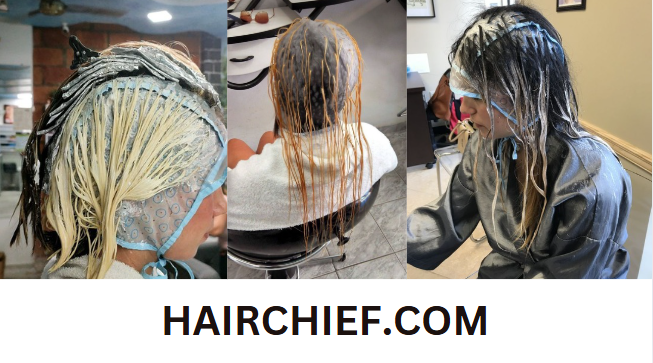
Using the pull-through hook, gently extract strands of hair through the cap apertures. The density of the highlights hinges on the quantity and thickness of the strands. For a subtle effect, fewer, finer strands suffice; for a bolder statement, choose denser sections.
4. Color Application
Prepare the coloring or bleaching agent per the product guidelines. Employ the applicator brush to meticulously saturate the exposed strands.
5. Processing Duration
Adhere to the product’s recommended processing time while monitoring closely to avoid over-processing, which can compromise hair integrity.
6. Rinsing and Cap Removal
Rinse thoroughly with the cap still in place to prevent uncolored sections from absorbing stray color. Carefully remove the cap post-rinse to mitigate tangles.
7. Final Steps
Apply a restorative conditioner to infuse moisture and shield the hair. Style to accentuate the freshly highlighted strands.
IV. Benefits of Cap Highlighting
- Exactitude: Ideal for fine or short hair, ensuring systematically placed highlights.
- Consistency: Reduces the risk of color overlap, maintaining uniformity.
- Economical: Requires minimal equipment, making it accessible for home use.
V. Drawbacks and Considerations
- Time-Intensive: The process can be laborious, particularly for novices.
- Limited Adaptability: Unsuitable for very thick or lengthy hair due to pulling challenges.
- Potential Discomfort: The strand-pulling process may irritate sensitive scalps.
VI. Strategies for Success
- Cap Selection: Silicone caps offer durability, while latex options provide flexibility.
- Practice Makes Perfect: Familiarize yourself with strand pulling before applying color.
- High-Quality Products: Invest in superior coloring agents to achieve professional-grade outcomes.
VII. Professional Expertise vs. DIY
When to Seek Professional Help
Opt for salon services if you are inexperienced or desire intricate highlights, as trained stylists ensure impeccable results.
DIY Tips for Enthusiasts
For home endeavors, study tutorials, allocate ample time, and meticulously follow instructions. Conduct a strand test to gauge the outcome before committing to the entire process.
_--- **Cap Sticking Hair Highlights: An Exhaustive Handbook** Enhancing your hair with highlights can breathe a rejuvenated and radiant aura into your appearance. Among the myriad techniques available, cap highlighting persists as a steadfast choice. Whether your preference leans toward delicate nuances or striking streaks, this method delivers precision and consistency. Here, we delve comprehensively into the nuances of cap sticking hair highlights, covering preparation, execution, and upkeep. --- ### **I. Introduction** #### What Constitutes Cap Highlighting? Cap highlighting is an artistic hair-coloring approach that utilizes a specialized cap adorned with pre-pierced apertures. Hair sections are meticulously drawn through these apertures and subsequently treated with color or bleach. This ensures a methodical placement of highlights, catering to those seeking a structured and harmonious aesthetic. #### Key Contrasts with Alternative Highlighting Techniques Unlike foil highlighting, which caters to broader section customization, or balayage, celebrated for its freehand and naturalistic allure, cap highlighting offers a regimented, symmetrical pattern. It is particularly suited for short to medium-length hair, where precision reigns supreme. #### Enduring Popularity and Modern-Day Relevance Having risen to prominence during the 1970s, cap highlighting remains a favored technique for its cost-effectiveness and user-friendly nature. Though contemporary methods like balayage dominate headlines, cap highlighting holds its ground among professionals and do-it-yourself aficionados for crafting fine, consistent highlights. --- ### **II. Tools and Materials Essentials** To undertake cap highlighting, the following instruments are indispensable: - **Highlighting Cap**: Crafted from latex or silicone, these caps feature methodically spaced openings. - **Pull-Through Hook or Needle**: Essential for threading hair strands through cap apertures. - **Bleaching or Coloring Formula**: Select a product tailored to your hair type and desired effect. - **Protective Gear**: Gloves and coverings to safeguard skin and hands. - **Mixing Bowl and Applicator Brush**: For uniform preparation and application of the coloring medium. --- ### **III. Step-by-Step Execution** #### 1. **Preparation** Commence by thoroughly cleansing and drying your hair. Clean hair ensures the color adheres uniformly. Opt for a snug-fitting cap to minimize shifting during the procedure. #### 2. **Cap Application** Secure the cap firmly, ensuring it sits evenly across your scalp. Fasten any straps or ties to stabilize its position. #### 3. **Strand Selection** Using the pull-through hook, gently extract strands of hair through the cap apertures. The density of the highlights hinges on the quantity and thickness of the strands. For a subtle effect, fewer, finer strands suffice; for a bolder statement, choose denser sections. #### 4. **Color Application** Prepare the coloring or bleaching agent per the product guidelines. Employ the applicator brush to meticulously saturate the exposed strands. #### 5. **Processing Duration** Adhere to the product’s recommended processing time while monitoring closely to avoid over-processing, which can compromise hair integrity. #### 6. **Rinsing and Cap Removal** Rinse thoroughly with the cap still in place to prevent uncolored sections from absorbing stray color. Carefully remove the cap post-rinse to mitigate tangles. #### 7. **Final Steps** Apply a restorative conditioner to infuse moisture and shield the hair. Style to accentuate the freshly highlighted strands. --- ### **IV. Benefits of Cap Highlighting** - **Exactitude**: Ideal for fine or short hair, ensuring systematically placed highlights. - **Consistency**: Reduces the risk of color overlap, maintaining uniformity. - **Economical**: Requires minimal equipment, making it accessible for home use. --- ### **V. Drawbacks and Considerations** - **Time-Intensive**: The process can be laborious, particularly for novices. - **Limited Adaptability**: Unsuitable for very thick or lengthy hair due to pulling challenges. - **Potential Discomfort**: The strand-pulling process may irritate sensitive scalps. --- ### **VI. Strategies for Success** - **Cap Selection**: Silicone caps offer durability, while latex options provide flexibility. - **Practice Makes Perfect**: Familiarize yourself with strand pulling before applying color. - **High-Quality Products**: Invest in superior coloring agents to achieve professional-grade outcomes. --- ### **VII. Professional Expertise vs. DIY** #### When to Seek Professional Help Opt for salon services if you are inexperienced or desire intricate highlights, as trained stylists ensure impeccable results. #### DIY Tips for Enthusiasts For home endeavors, study tutorials, allocate ample time, and meticulously follow instructions. Conduct a strand test to gauge the outcome before committing to the entire process. --- ### **VIII. Alternative Highlighting Techniques** #### Foil Highlights Favored for their versatility, foils facilitate detailed customization, ideal for bold or blended effects. #### Balayage This freestyle method delivers a sunlit, organic look with smooth transitions. #### Choosing the Right Technique Your choice should align with your hair’s characteristics and aesthetic aspirations. For precision and symmetry, cap highlighting remains unrivaled. --- ### **IX. Post-Highlight Maintenance** - **Recommended Products**: Use sulfate-free shampoos and conditioners designed for colored hair. - **Hydration and Shielding**: Regularly apply hair masks and safeguard against UV exposure. - **Routine Touch-Ups**: Refresh highlights every 6-8 weeks, depending on growth and fading. --- ### **X. Final Thoughts** Cap highlighting endures as a dependable technique for achieving uniform, polished hair streaks. Armed with the proper tools, know-how, and maintenance, this method offers a radiant transformation that accentuates your style. Whether entrusting a professional or embracing the DIY route, its affordability and precision render it a timeless choice in hair artistry.](https://hairchief.com/wp-content/uploads/2025/01/36d45187ab5fd0c7ebf1e8d30fcaa1c7-662x1024.jpg)
VIII. Alternative Highlighting Techniques
Foil Highlights
Favored for their versatility, foils facilitate detailed customization, ideal for bold or blended effects.
Balayage
This freestyle method delivers a sunlit, organic look with smooth transitions.
Choosing the Right Technique
Your choice should align with your hair’s characteristics and aesthetic aspirations. For precision and symmetry, cap highlighting remains unrivaled.IX. Post-Highlight Maintenance
- Recommended Products: Use sulfate-free shampoos and conditioners designed for colored hair.
- Hydration and Shielding: Regularly apply hair masks and safeguard against UV exposure.
- Routine Touch-Ups: Refresh highlights every 6-8 weeks, depending on growth and fading.
X. Final Thoughts
Cap highlighting endures as a dependable technique for achieving uniform, polished hair streaks. Armed with the proper tools, know-how, and maintenance, this method offers a radiant transformation that accentuates your style. Whether entrusting a professional or embracing the DIY route, its affordability and precision render it a timeless choice in hair artistry.